Lit from Within: dots
-->
Showing posts with label dots. Show all posts

Wednesday, September 17, 2014

Geometric Angles And Dots


Hello, Fireflies!

I love this month's geometric theme - it's a little broad, but I love the general feel of geometric nail art.  Today, I have a simple interpretation for you.

I started off with Cult Nails Thrive, a mint green with shimmer.  It was pretty thick, and kinda difficult to work with, but the color was kinda worth it.  Soo pretty.

Cult Nails Thrive, a mint green with shimmer

I made a chevron French tip with Cult Nails Midnight Mist, a gorgeous mushroom-y taupe with a copper shimmer.  I love complex shimmery colors like this.

Cult Nails Midnight Mist, a gorgeous mushroom-y taupe with a copper shimmer

I was trying to make these gold dots into a pattern I had seen on some water decals.  If you squint and turn your head, stand on one foot, and grunt three times, you might be able to see a shepherd's hook with the big dots, and then the little dots form a curve around it.


Can't see it?  Try grunting louder...


Bottle shot:  Cult Nails Thrive, Cult Nails Midnight Mist, and Maybelline Bold Gold.

Bottle shot:  Cult Nails Thrive, Cult Nails Midnight Mist, and Maybelline Bold Gold

Next time, I'll probably just use the water decals! Have you ever tried to freehand something, and thought - oh, I shoulda just used a stamp, or a decal? Oh, I coulda had a V-8!


Wednesday, September 10, 2014

Carpe Noctem Purple Patchwork


Hello, Fireflies!

Can every month be geometric manis month?  I love all the different interpretations of this theme.  I found this nail art on Chickettes that I thought was so much fun, and decided to do my own version with some Carpe Noctem Cosmetics polishes.

Carpe Noctem Sapphire Abyss made my camera cry.  I know it looks like I covered my camera lens in Vaseline, a la Cybill Shepherd's Moonlighting days (Google it, young'uns!) but I didn't.  It's just so soft and shiny; it's so beautiful.

Carpe Noctem Sapphire Abyss

I applied some tape strips and did some freehand to make this patchwork of purples.  The light, orchid color is Carpe Noctem I'm A BIG F*cking Deal and the eggplant is Carpe Noctem Interstellar Towel.

The light, orchid color is Carpe Noctem I'm A BIG F*cking Deal and the eggplant is Carpe Noctem Interstellar Towel

I love how the white dots just make the whole mani look sharper and more defined. Except for that whole Vaseline thing.  Maybe it's time for a new camera?


I love how they're all purple, but so different!


Bottle shot: Carpe Noctem Sapphire Abyss, I'm A BIG F*cking Deal, and Interstellar Towel, and Sally Hansen White Tip.

Bottle shot: Carpe Noctem Sapphire Abyss, Carpe Noctem I'm A BIG F*cking Deal, Carpe Noctem Interstellar Towel, and Sally Hansen White Tip

Kinda makes me want to do an eyeshadow look with colors like these.  Would you?


Saturday, April 5, 2014

A Kiss For A Crystal Holo Mystic

Hello, Fireflies!

Y'all know that I have a ton of nail polish.  If you didn't, well, I'm telling you now.  I have a lot.  So, when I tell you that there is a polish the likes of which I have not seen before, I think it's something special - and I kinda hope that you'll think it's special, too.

Otherwise, I feel a little stupid for getting so excited. 

Joss A Crystal Holo Mystic is one of those special polishes.  It's holo, but there's added fleck.  It has a nude background, but the red flecks make it look mottled and more red.  What color is it?  I don't know.  Is it holo or glitter? both?

Joss A Crystal Holo Mystic is one of those special polishes

The red in A Crystal Holo Mystic just called to me for more MOAR red!  This is Cult Nails Kiss, a wax finish red creme.  Gorgeous!

Cult Nails Kiss, a wax finish red creme

I just used the brushes the polishes came with to make these stripes - by turning the brush sideways, or adjusting the pressure on the brush, you can make wider or narrower stripes.  And, I don't have to clean a nail art brush!  I did use a dotting tool for the dots, but those are easy to clean.

by turning the brush sideways, or adjusting the pressure on the brush, you can make wider or narrower stripes

I actually really liked the holo against the wax finish, but I had to try it with topcoat, too.  Times like these, I kinda wish my nails were bigger so I could add more stripes. I love how my thumb turned out!


Bottle shot:  Joss A Crystal Holo Mystic, and Cult Nails Kiss.


A funky glitter holo, and a wax-finish red.  I think they're both pretty unique polishes!

Monday, March 3, 2014

Blue and Grey and Dots and Studs #NailArtForNubs

Hello, Fireflies!

If you missed it, I had a post go live earlier today.  Click HERE to see my review of February's Beauty Box 5!

But now, for my #NailArtForNubs!  Today's look was inspired by Raggio di Luna dots and square studs nail art.  She does some of the most creative nail art, and I really love her style.

I started off with Paula Dorf Stormy, a light grey creme.  I picked up a few Paula Dorf polishes in a blog sale, and I've loved each one so far! Great formula.

Paula Dorf Stormy, a light grey creme

On top, for a little sparkle, I layered NailNation 3000 Dancing In The Sky, a light grey holo.  I love how it adds a slight blue tinge.

 for a little sparkle, I layered NailNation 3000 Dancing In The Sky, a light grey holo

I had some trouble lining up the dots in the center.  I tried to put a marker in the center (like on my thumb) with Julep Josephine, and then build the diamond on top of it.  This worked better for some nails than others.  Probably because some of my nails are wonkier than others!

Also, geometry is important, kids.  Stay in school.

I tried to put a marker in the center (like on my thumb) with Julep Josephine, and then build the diamond on top of it.

I used Julep Char for the next set of dots, sweeping to one side..

Julep Char for the next set of dots

And I used Julep Something Blue to make the dots that swept to the other side.

Julep Something Blue to make the dots that swept to the other side

The original nail art used square studs, but I'm so in love with these triangle studs I just got, I had to use them instead.  I love a good stud.

I'm so in love with these triangle studs

Topcoat is essential for keeping a stud in its place.  All studs should be properly, um, restrained.  Use your imagination.


Bottle shot:  Paula Dorf Stormy, NailNation 3000 Dancing In The Sky, and Julep Josephine, Char, and Something Blue.

Bottle shot:  Paula Dorf Stormy, NailNation 3000 Dancing In The Sky, and Julep Josephine, Char, and Something Blue.

Hopefully, you're seeing through this series that even nubs are a playground for studs.. and nail art! No need to hide your hands because of short nails!


Monday, January 27, 2014

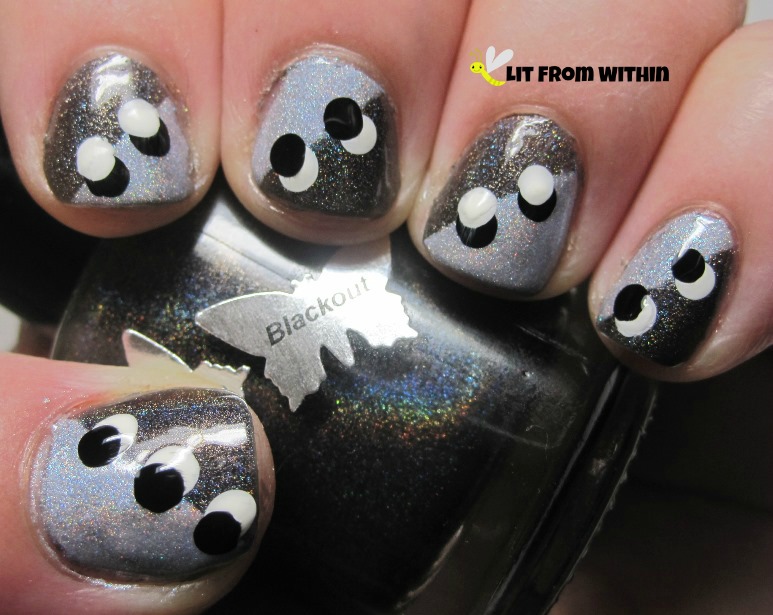
What's Black and White and holo and dotted? #NailArtForNubs

Hello, Fireflies!

I am so stoked about today's nail art - it's holo, it's black and white, it's geometric, it has dots, AND it looks great on nubs.  

I may hyperventilate.

If you'd like to see the original that inspired me, check out art by LeVernis.

It all starts with this black holo beauty, Treasures by Tan Blackout.

Treasures by Tan Blackout

If you're going to use Scotch (or any clear tape, really) for nail art, I suggest 2 things:  1) make sure your base coat is really, really, super-duper, extra dry.  Anything not firmly adhered to your nail will come away with the tape.  2) put the tape on your hand or arm first.  The tape will pick up some of your body oils and not be quite as sticky. Don't worry, unless you're a dirtybird, it will still be plenty sticky enough.

So, I, not being a dirtybird, and having allowed Blackout to dry thoroughly, I placed my tape on my hand, and then I used the tape to mark off diagonals either for the top or bottom of each nail. Then, I painted Different Dimension Can We Carol On on the exposed nail.

I painted Different Dimension Can We Carol On on the exposed nail

For being such a delicate, white holo, look how wonderfully it covers the black!  Different Dimension makes some of the BEST holos. 


If the white holo was on the bottom, I started with a large black dot.  If the black holo was on the bottom, I started with a large white dot.  Then, the opposing color went on top.


Note that the dots are in plain polish, not holo.  I think if the dots were holo, it wouldn't be as striking, visually.  Your mileage may vary.


Bottle shot: Treasures by Tan Blackout, Different Dimension Can We Carol On, Milani White on the Spot, and Wet 'n Wild Black Creme.

Bottle shot: Treasures by Tan Blackout, Different Dimension Can We Carol On, Milani White on the Spot, and Wet 'n Wild Black Creme.

I am in love with this look! Broken down, it's not hard - a diagonal line (which gets dots over it that can cover any mistakes you might make.  I'm not saying I made any.) and a couple of dots.

If you do this, I'd love for you to share on my Facebook wall.  What colors would you use?

By the way, two posts today! If you missed my Make Up Monday post on Beautifying Oils, you can find it HERE.


Wednesday, December 25, 2013

Holo (day) French Tips

Merry Christmas, Fireflies!

Or, if you don't celebrate this particular holiday, Happy 25th of December!

Either way, today calls for a super shiny holo.  This is Enchanted Polish Dime Piece.  It's like liquid Spectraflair, it's so holo.

I have seen some comparisons online that make this a very close likeness to the Color Club Holo Hues silver holo, which you might have an easier time getting, as Enchanted Polishes are a beast at restocks, and go for upwards of $25 in the resale market.


Today's holiday nail art was inspired by this collection, which I've mentioned before as one of those theme posts that may not have links back to the original artists. I'm sorry I don't know who to give credit to for this idea.

I used Colors by Llarowe Holly to make the French tip.  The first pass of this polish is very thin, and looks purple! It takes 2 or three coats to get that deep green, and even then there is a bit of duochrome effect.  I gotta hand it to Llarowe, her collections have been getting better and better.

I used Colors by Llarowe Holly to make the French tip

Next, I used the Milani gold glitter striper over the green.  Looking like a garland now!

Next, I used the Milani gold glitter striper over the green

Finally, I made dots with Enchanted Polish November 2013, a pretty reddish holo. 

Enchanted Polish November 2013, a pretty reddish holo

Silver and Gold, Red and Green - I think I got all the holiday colors in there!


Bottle shot:  Enchanted Polish Dime Piece, Colors by Llarowe Holly, Enchanted Polish November 2013, and Milani Gold nail art striper.

Bottle shot:  Enchanted Polish Dime Piece, Colors by Llarowe Holly, Enchanted Polish November 2013, and Milani Gold nail art striper.

From all of us, to all of you, I wish you much happiness this holiday season, and all through the year.  I'm so grateful for the opportunity to share my love of nail polish and beauty stuffs with you!

Thursday, December 12, 2013

Fakin' a stamp with Aly's Dream Polish

Hello, Fireflies!

So, the other day, I saw this Pinterest of a mani by Liloo that looked like it was stamped.  And, foolishly, I thought, "Hey, I don't need a stamp to do that! I got mad skillz."

And then I woke up!

But, I tried it anyway.... I started with the lovely, lovely Aly's Dream Polish Rumpleberry.

Aly's Dream Polish Rumpleberry.

Like most Aly's, it's a scattered holo, great formula.  The Macaron collection is less holo than most, probably because they're pastels.  It's not a straight creme, though.

Like most Aly's, it's a scattered holo, great formula

First, I took my trusty black striper and drew the lines.  I decided to refill my striper with Wet 'n Wild Black Creme.  Don't do this.  It's not as opaque as a striper polish, and you'll have to go over everything twice...

I took my trusty black striper and drew the lines.

I made the dots with a dotting tool and Wet 'n Wild Black Creme.


I tried to add some flakies with Sally Hansen Glass Slipper, but it didn't really work.  I did use the sponge technique with Nubar Black Polka Dots to get enough density to fill the areas with black dots.  Worked like a charm...if a little hard to do on my right hand.

Always a little harder to do on my right hand

Bottle shot:  Aly's Dream Polish Rumpleberry, Wet 'n Wild Black Creme, black striper, Sally Hansen Glass Slipper, and Nubar Black Polka Dots.

Bottle shot:  Aly's Dream Polish Rumpleberry, Wet 'n Wild Black Creme, black striper, Sally Hansen Glass Slipper, and Nubar Black Polka Dots.

If I ever find a stamp in my collection that looks like this, I'll have to do another mani! This one took a little longer, but I like how it came out.  Would you do this without a stamp?

Sunday, November 11, 2012

Stamping Sunday - What if my Hubby stamped my nails?


Today's challenge was to see what our nails would look like if our husband/boyfriend/S.O stamped our nails for us.  So, that's exactly what I did!

I started off with a lovely purple duochrome.  Royal purple is the hubs' fave color.  This is Ludurana Aurora Boreal Emocionante.


I offered the hubby two of my polishes that I thought were the easiest to stamp with - Maybelline Bold Gold and Essie No Place Like Chrome.  He chose silver, and this polka-dot stamp from the Cheeky Jumbo plate.


I showed him once how to do it on a piece of paper, and then he tried it on paper, and then away he went.  Not bad for a first attempt, I must say.  


When he was done, he told me that he chose this pattern because it seemed fairly idiot-proof.  Well, he did get some dots on my nail, and they look like dots, so I suppose he succeeded! 

Did you stamp today?
Related Posts Plugin for WordPress, Blogger...