Lit from Within: April 2012
-->

Monday, April 30, 2012

Capturing sunshine in a bottle

I have tried many of the a-england holos, and they are beautiful.. but I wanted to try a real, super-shiny, super holo polish.  I had seen swatches of Layla before, but at $15 a bottle, I didn't want to go there.

Enter Ulta, with a 20% off coupon.  I bought two.  This is Retro Pink 03.

First lesson.  I had heard that you can't use regular base coat with a holo, and I didn't have a special one.  So, I thought I would try layering it over a light pink polish from Essence.

Um, no.  You can see the big hole on my thumb nail where the polish dragged, and all the nails have similar problems.  So, either get a matte or special base coat, or just layer it over itself on a bare nail.


It does tend to get dull if you don't use a base coat - it looks like it soaks into the nail or something.  I used two coats to mitigate that.  It was almost painful to do so because the bottle is so small... only 10 ml.


But boy, is it pretty.  oooh, shiny.  This is indoors, at night, with ceiling light.


I felt like playing around with some tape and Revlon's Naughty.  I like the effect, can't wait to try it with real striping tape.  I freehanded the tips with a striper brush.  Only the thumb has topcoat.  You can tell a little bit that it affects the holo.

Here's my right hand.


The next day, I took a couple of pix in the sunlight to try and capture the holo effect.  It was crazy in RL, but of course it doesn't really show much in the pix.  If you like holos, you need a Layla holo.  It will make you happy.  Maybe.  It made me happy, anyway.


Sunday, April 29, 2012

Psuedo-daisies

I fell in love with this daisy manicure I found on Pinterest.  I have a bunch of stamping plates, but no daisies.  I was crushed, heartbroken. 

This, obviously, would make a great gift for me.  Happy un-birthday, or something.

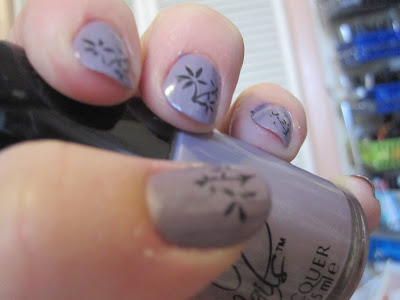
So, no daisies, no Pippa yellow, so I modified and ran with it.  This is Cult Nails' My kind of Kool-aid.  LOVE.  I have been in a lavender mood lately, and this was perfect.  Great application, almost no clean-up needed.  2 coats.


Then I stamped some flowers.. ok, this was like the 2nd or 3rd stamp I tried.  I actually had to re-paint all my nails because I couldn't get some of them to work right.

It was worth it, though.  I really like this. 


Then I embellished the flowers with random, no-name art pens I got at Big Lots in purple and glitter, and dotted the flower centers with white.  Sealed with Seche Vite topcoat.


Pretty, dainty, evocative of Spring.  Happy.


Saturday, April 28, 2012

Epic nailpolish shopping day!

Today, I love my Sally's beauty supply.  This month, they have had a buy 2 - get 1 free on all nail polishes.  I used it with a 15% off coupon earlier in the month, but yesterday I snagged a birthday coupon off a blog ($10 off a purchase of $20) and went to see if I could get the Dark Shadows collection from Orly.  It's not officially supposed to be released until May, but some bloggers are saying that they convinced someone to get it from the back room.. mine had the display out already.

So I got them!  I only wanted 3 of the 4.  From left to right:  Buried Alive, Mysterious Curse, and Decades of Dysfunction.

Buried Alive is a shimmery brown.  It's smooth to the touch, but looks like it has texture, because it's full of shimmery micro-glitter.  I love browns, and this is a great one to add to my collection.

Mysterious curse is a blue-purple duochrome.  I love duo- and multi-chromes, and this is a beautiful polish.  I can't seem to get enough dark blue polishes.

Decades of Dysfunction is a bisque - not quite white, a hint of pinky-beige.  I don't have anything like it.  It took 3 coats for opaqueness, but it's worth it.  Orly polishes are among my fave for color and application.

Each color here is shown without top coat.  D of D has 3 coats of polish, the others have 2.


I had just bought Milani Chocolate Sprinkles (on my pinky), so I wanted to see if it was a dupe with Buried Alive (ring finger).  It's not.  They both have micro glitter, but the Milani's glitter is more coppery.  And the base color is more espresso, almost gunmetal.   I also just bought an Orly mini of Chocolate Martini (middle finger) online, so I wanted to see what it looked like.  Nothing like the others, but a beautiful glowy copper.  I pulled an older, much loved China Glaze - Unplugged (index finger) to see if it compared to the others.  It's close in base color to Buried Alive, but it doesn't have the glitter at all, and is much shinier.


I also scored some other Orly polishes on clearance for 4 dollars, and got the buy 2 get one free deal, too.  If you have a Sally's and you like those Orly Dark Shadows polishes, it'll save you a few bucks to see if you can get the collection while they still have that nail polish deal.  It's only good through April.

Fail blog, nail-style

I think the moon must have been in retrograde, or Mars was angry, or my chakras weren't aligned this night of polish, because nothing I did worked.

I started with a coat of Loreal's Tangerine Crush. 1st mistake:  I didn't take a pix.  No pix, didn't happen, right?

I tried a few different ideas to layer, but nothing worked, so I tried Orly's FX in Space Cadet.  I thought it would be a sheer layering polish, but in 2 coats, it was opaque, and you couldn't tell what I had on my nails underneath it.


I really like this polish - I'm a sucker for duochromes.  And I liked the sparkles, but they weren't like that chunky glitter that is hard to remove.  This was easy.


Good thing, too, because I dented my nail.  And, I wanted to try more polishes.


So, I tried this almost-neon lime color from Revlon I got for a buck at Big Lots.  This was actually a nice formula, and I like the spring-y yellow/green thing.  It's called Super Nature.

And, I broke the nail on my index finger.  Insert raspberry here.


Thought I would try dotting some flowers on with metallic blue and purple and a hot pink.  I think it looks like a 5-yr old colored on my nails.  See what happens when I try to be creative on my own?  My inner child comes out.  Usually, it's a 12-yr old boy who likes poop jokes, but this time I went younger.


This didn't even get finished on my right hand.  Off, off, off.

Friday, April 27, 2012

Needs no explanation


Ms. Ruby Stipple-tips

I think the title of this post sounds like a posh English lady.  I imagine it in my head said with a very dignified accent like in Pride and Prejudice or Emma (from the BBC, natch)

Anyhoo, I was trying to do a version of this manicure I saw on Pinterest.  I don't have much in the way of creativity, but I like trying to copy or make my own version of stuff I see other people do.  I wish I was more creative, but we do the best with what we have.

So, I started with this Revlon polish I got at Big Lots for a buck.  Lilac Pastelle.  It was worth about a buck, too.  Streaky, thick, bunchy application.  Probably going to send it to Zoya for their Earth Day promo. 

Then I used another Big Lots polish,  Colormates Metallic Venom (love the name) and two different sized dotting tools to make the tip.  In retrospect, even though my nails are obviously all shaped differently, I should have stuck with either straight or curved tips for all the nails, because it just looks like I couldn't make up my mind.  I wish I could grow and shape them all the same, but I don't seem to be that talented...


My right hand was a disaster, but I painted it, so I might as well show it to the one or two people reading this! lol.  I do like these colors, though.  I have a LOT of purple polishes, and can't seem to get enough.  And the lilac (though it is really pink) is flattering to my skintone. 


Dotting tools are da bomb-diggity, too.

Thursday, April 26, 2012

Monday blues

I can't stay away from the Sally's nail polish sale this month... got my 15% off coupon in the mail, so I went to see if there was anything else I needed.  I had seen swatches of China Glaze First Mate and Secret Peri-wink-le which had me lemming them... so now they are mine.  And I had to use them right away!

I thought they would look good in a gradient tape mani with Revlon Indigo Night.  I love this color, and would wear it all by itself.. it's a rich blue creme.  It applied great.  I'm loving the new Colorstay formula.


After Indigo Night dried, then I cut narrow strips of scotch tape and applied them diagonally to my nails.


For this mani, I actually applied one coat of Secret Peri-wink-le on top, a coat of First Mate on the bottom, and then applied a little more SP on the top to get it opaque BEFORE I pulled off the tape. I then dabbed a little more Indigo Night where needed, and finished it off with topcoat.


I love that this mani looks great on my short nails.  And, because you only use one piece of tape, it's easier to make the diagonal lines look nice.  I'm sure this will get easier with practice.

Right hand:


Wednesday, April 25, 2012

Mug-inspiration

As if having one blog where my voice echoes into the emptiness isn't enough, I actually  have another, personal blog that I update from time to time.   I wrote today about my love for shopping and clearance (and polish) and wanted to write a more comprehensive post about the polish part.

I bought this beautiful mug at either TJ Maxx, or Marshalls, I can't remember.  It was on clearance.  Woot!  I wanted to try to do a mani inspired by the artwork on it.


I started with a basecoat, and then a coat of Revlon's Aloof.  I have been looking for a white that is wearable.  This is leaning towards grey/silver, but not too much.  I really like it.  If I was wearing it alone, I would have used two coats, but this is one and a little bit extra on the tips.


To make the background stems, I stamped with China Glaze Holly-day, a medium/dark green creme.
 

Then I took a small paintbrush and dabbed on Milani Purple Passion mixed with a little bit of Essence No More Drama


To make the rose, I mixed white with a little bit of a champagne color, Fizz It is, by Sally Hansen, and used a small paintbrush.


 I painted the center of the rose with Nubar Verde. 


I know it's a leeetle bit of a hot mess, but I like it.  It looks a lot like the mug to me.


It was so much work, though, I didn't want to do it on my right hand.  So, I tried out Nubar's Black polka-dots over the Aloof.  Love!

Yes, I'm still wearing a different mani on each hand as I write this.  I like both.  Don't worry, I'll be wearing something completely different tomorrow, I'm sure.


Weeds are just flowers that grow where they're not planted

One of the hot manis on Pinterest that I think is adorable is this dandelion mani from Mad Manis.  I thought it might be simple enough for a newbie like me, and still be cute.

After applying the ridge-filling base coat, I followed up with 2 coats of Essie's Fair Game in this cute little mini bottle.  I love this color - I love blues, and this is a grey, shimmery blue.  The closest thing I have to it is Zoya's Skylar, but Skylar is more blue and has micro-glitter in it.


After the blue dried, I applied a coat of Seche Vite.  When that was dry, I got out my dotting tool and made one black dot (Pure Ice Black Rage) on my thumb, middle finger and pinky, and then drew a line from that dot to the edge of my nail.


I used OPI's I Vant to Be A-Lone Star for the dandelion puffs.  It's like a silver with a blue tinge to it.  Or maybe it's just silver.  But it evokes blue to me.  It's very delicate, though, so I thought it worked nicely for this.


As an after thought, I dabbed on Hot Ticket's Dodged a Bullet over the petals, which I think added a little depth to the flower.  Or, I could be full of crap.  It's possible.


Ok, so you have to use your imagination a little to see that these are dandelions, but I like the effect, and it's a simple, subtle nail art.

Tuesday, April 24, 2012

When I am too old for neon and glitter...


I have recently found that resell stores like TJMaxx sometimes have nail polish!  I found a cute set of neons from Simply Sweet for about $5, and, having never done a neon nail, decided to see what the fuss was about. 

I thought pink was the safest bet for a neon newbie like myself.  I knew enough that neons should have a base coat of white in order to really pop, so I started with Sally Hansen's White Tip.


I see so many white or black/white manis, but everyone says that whites are streaky.  This one sure is.  I need recommendations for a white that can be used on its own for a mani. 


2 coats of  the name-less neon pink.  Like I'd heard, it dried with a rather matte finish, so I put some Seche Vite on tip for some shine.  But I couldn't leave it there, so I painted a black line in a curved motion from the side of my nail to the tip, and filled in with glitter.


Accent nails got a coat or two of Purple Palette, and the other nails were painted with Hue Left a Message? from Finger Paints.  These glitters had pretty good coverage without being opaque.  I was surprised that I could see the pink glitter clearly, even over the neon.  They went on easily enough, but, like most glitters, were a pain in the tuchus to take off.  Oy vey.


I finished the look with a few dotted hi-lights in China Glaze Icicle, and another coat of Seche Vite.

I am envious of the bloggers who get compliments on their manis.. today I got one compliment, and I was thrilled. :) (They like me, they really like me! /Sally Field)

Monday, April 23, 2012

Taco Night spicy red nails..


Hubby and I got invited to a very special dinner with our friend Jeanette to visit with her parents who were in from out of town. I love Jeanette and I love her parents, and Jeanette loves my manicures, so I had to find something special to wear.

Plus, it was TACO NIGHT.

So, I thought a spicy, shimmery red concoction might pay homage to the wonderful evening that somehow we got invited to.

I did my version of this mani from Sweet Sugar.  I wanted more nails painted, and well, my nails are half the size of hers, so I had to modify the art a little.  I used Hot Ticket's Better Off Red (2 coats) for the base, and Pure Ice Black Rage for the lines and China Glace Icicle for the silver hi-lights.


Practicing with my right hand... but this time, people saw it! :)


After dinner, we played around with the a-england polishes and she picked out Dragon for a mani.  I also stamped lizards on it, but for some reason, we forgot to take a picture of that.  I'm new at this, so sue me.  Maybe next taco night...


Sunday, April 22, 2012

stamping rodeo

A bit ago, I bought the entire Rodeo Diva collection from China Glaze.  I've never purchased an entire collection before!  I saw it swatched on blogs and decided I needed every color, they were so beautiful.  I paired two of them for this manicure:  Lasso My Heart (light purple) and Midnight Ride (blackened purple).


Lasso My Heart is a beautiful color, and I'm glad I own it!  It's a glowing mauve-y purple with a shimmer. 

I then stamped it with Midnight Ride, which looks purple in the bottle (above) but in the stamp, you couldn't really see as much purple as I would have liked.   It makes a nice contrast with LMH, without the stark contrast of a black, though, which I think is a softer look.


I've been reading a lot of Chloe's nails lately, and she loves to do black french tips, so I thought I'd try free-handing some with the MR.


It didn't turn out too badly, but I think it would look better if my nails were long and square like hers!  I'm going to keep trying, though.  One of the reasons I like having this blog is that it's a chance to show nail art on "everywoman nails.'  Mine are short and stubby, and my nail beds are very small, and my nails typically don't grow very long before they start peeling and breaking.  So, even if you don't have 'picture perfect' nails, be proud of what you've got and flaunt them!


Saturday, April 21, 2012

Purplenurple dots and spots

I was inspired by Pixel's gradient-dot mani for today's look.  I wasn't feeling the neons she used, so I opted for a pink/purple combo.  The pink is Orly's Sugar Plum, and the purple is Sally Hansen's complete salon manicure in Bewitched.

After applying my base coat, I applied two coats of Sugar Plum.  When it was dry, I placed tape in a diagonal line across my nails, and painted the bottom with Bewitched.  I still had VNL with the pink, so I wanted to use the darker color over the tip. 


Next, take a dotting tool and make dots along the diagonal line, about halfway in each color.  Leave a gap between each dot.  I did the dark color first because my taping got a little sloppy - so I used the dots to cover my mistakes.


Then, take the other color and dot the tops of the gaps.  The colors should now look like they're dripping into each other.


I need more practice spacing the dots where I want them to go.  Here's my attempt at putting the purple dots on the pink side, and the pink dots on the purple side.


I did my right hand first, to practice on, in case I screwed up... but I think it's worth a picture, even though it's not perfect.


And here's the finished left hand.


Some lessons learned in this mani are learning how to steady my hands on a notebook to get my right hand done, and to use a more opaque color for the pink - it's a little milky-looking on the purple side.  Overall, I like it, though.  Dots are keen.  If I ever get any followers, I'd love to hear how others use their dotting tool to create manis.

Related Posts Plugin for WordPress, Blogger...